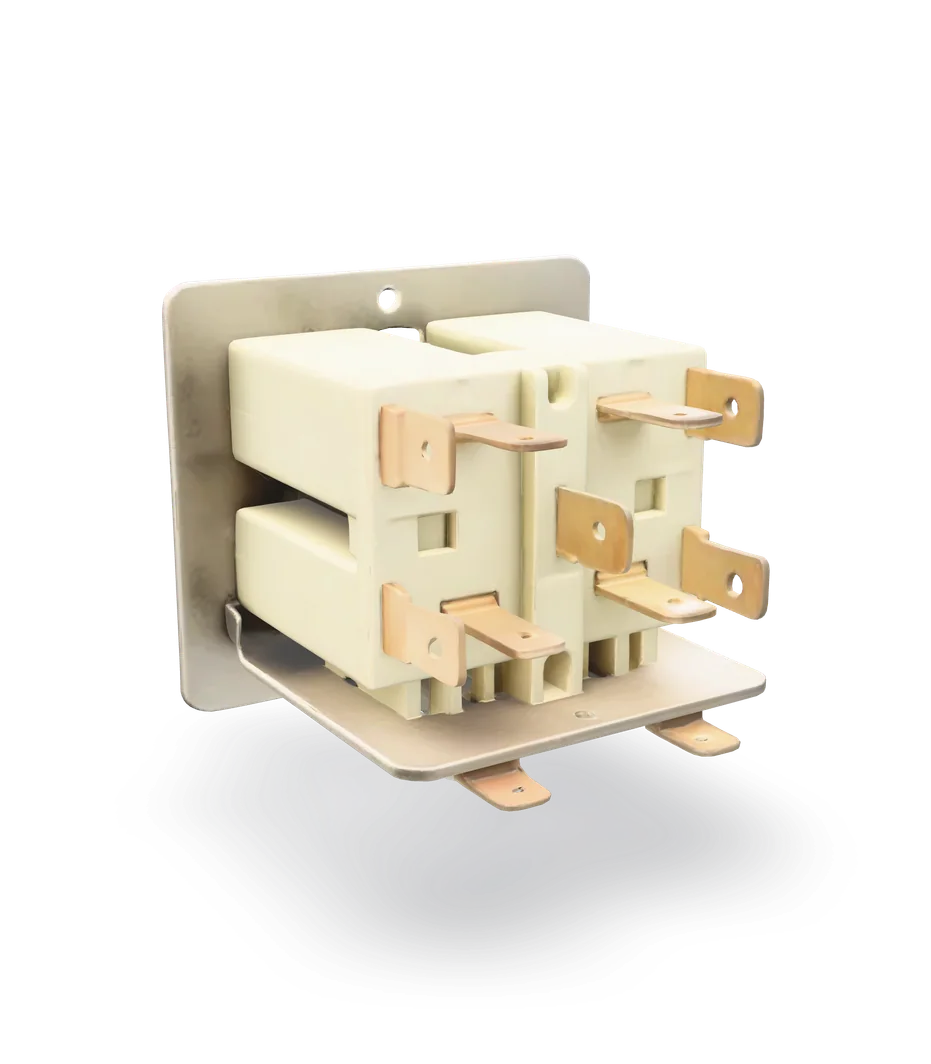
Air handler heat sequencer: test and replace it
Good news: a sequencer is a small, cheap part held by two screws. The care is in the 240 V power around it and in moving every wire to the same terminal on the new one.
- Difficulty
- Moderate
- Time
- 30 min–1.3 hr
- Typical part cost
- $40–$55Pro: $150–$650
- Tools
- 6See the list
Two screws and a handful of wires, but they are 240 V wires, and there can be more than one circuit to turn off and prove dead. Moving each wire to the matching terminal is the whole job.
What it does
What the sequencer does
The heat strips draw a lot of current. Switching them all on at once would hit the wiring and breakers hard. The sequencer brings them on one stage at a time instead.
Inside is a tiny heater and a bimetal strip. When the thermostat or control board sends 24 V, the heater warms the strip, it bends, and the first switch closes. The next switches close after their own delays, usually tens of seconds apart.
There is usually one switch for each heat strip. Some air handlers use relays or a contactor to switch the strips instead. They do the same job and are swapped the same way.
Why it fails
The little heater inside burns open with age. Then none of its switches close, and the strips it controls stay cold.
The switches carry heavy current every time the heat runs. Their contacts can burn and stop closing, so one strip drops out while the others still work.
Less often, a switch's contacts weld shut. Then a strip keeps heating after the thermostat stops calling.
Loose wires at the sequencer heat up, scorch and burn.
Symptoms
Signs of a bad sequencer
Blower runs, heat strips stay cold
On emergency heat the blower runs but the air never warms. The strips may be fine and the sequencer is not switching them on.
Full diagnosisOnly part of the heat comes on
The air gets a little warm but not as warm as it used to. One switch in the sequencer, or one relay, may have failed while the others still work.
Full diagnosisScorch marks or a burning smell
With the power off, you see a melted or blackened terminal on the sequencer, or you smell burning near it when the heat runs. Turn the system off.
How to test it
Test the sequencer before you buy
- With every breaker and the disconnect off and the wires proven dead, as in steps 1 to 4 below, find the sequencer. It is a small block with spade terminals, near the heat kit or the control board.
- Look at each terminal and wire end. Check for scorching, melted plastic or a wire that has come loose.
- Good
- Clean terminals and tight wires. Move on to the meter tests.
- Bad
- A burned terminal or melted wire end means the sequencer is suspect, and the wire may need repair too. If the damage reaches the wiring, call a pro.
- Power still off and proven dead. Find the two small terminals for the 24 V heater coil. They are usually marked on the sequencer's label, often at one end.
- Take a photo, then take one of the small wires off the coil.
- Touch one probe to each coil terminal.
A good heater coil reads
A steady reading, not OL
Typical range. Check your part label or manual for the exact spec. The exact reading differs from one sequencer to the next, so there is no single number to aim for. What matters is that it is not OL.
- Good
- Any steady reading means the heater coil is intact. Test the switches next.
- Bad
- OL means the heater coil is open. None of its switches can close. Replace the sequencer.
- Power still off. Give it a few minutes first: the switches open on a delay after the power goes off, and some take a minute or two.
- Take the wire off one side of a switch, so the meter reads only that switch.
- Touch one probe to each terminal of that switch. Repeat for each switch.
With no heat called, a good switch reads
OL (open)
Typical range. Check your part label or manual for the exact spec. Whether each switch closes once it gets 24 V can only be checked with the power on. That is a live test inside a cabinet with 240 V present, so leave it to a pro.
- Good
- OL on every switch. They are open at rest, as they should be.
- Bad
- Continuity on a switch after the power has been off for a few minutes means its contacts are stuck closed. Replace the sequencer.
Safety first
Before you touch anything
- 1
Every breaker off, then prove it
Set the thermostat to off. Turn off every breaker that feeds the air handler, any breakers on the heat kit, and the disconnect next to the unit. Then prove the sequencer's wires dead with a tester you have just checked on a live outlet.
- 2
Lock or tag the breakers
Use a breaker lock if your panel takes one. If not, tape over each breaker with a note so nobody turns it on while you work.
- 3
Keep clear of the run capacitor
The blower's run capacitor can hold a charge after the power is off. Keep your hands and tools off its terminals, or discharge it first as in our [run capacitor guide](/air-handler/run-capacitor).
Tools you'll need
Grab these first
Tool and part links are affiliate links. We may earn a commission at no extra cost to you, and it never changes what we tell you to check first. How this works
- Non-contact voltage testerPen styleProves the sequencer's wires are dead before you touch them. Check it on a live outlet first.Typically $15–$30Shop this tool
- Digital multimeterΩ, V, µF, µATests the sequencer's heater coil and switches with the power off.Typically $25–$60Shop this tool
- Nut driver1/4 in. hexBlower door and sequencer mounting screws are often 1/4 in. hex heads.Typically $6–$15Shop this tool
- Needle-nose pliersPulls tight spade connectors off the terminals without yanking the wire.Typically $8–$20Shop this tool
- Painter's tape and markerLabels every wire, and tags the breakers off.Typically $5–$12Shop this tool
- HeadlampThe sequencer sits in a dim corner of the cabinet. Keeps both hands free.Typically $12–$30Shop this tool
Step by step
How to replace the sequencer
- 1
Thermostat off, every breaker off
Set the thermostat to off.
At the main panel, turn off every breaker for the air handler. With electric heat the unit may be fed by more than one double breaker.
Careful. One breaker off is not enough. Any circuit that feeds the heat kit can still be live at the sequencer.
- 2
Disconnect off, and tag it all
Turn off the disconnect next to the air handler and any breakers on the heat kit. Tag each one so nobody turns it back on.
- 3
Take off the blower door
Remove the screws and lift the blower door away. The sequencer is a small block near the heat kit or the control board, with heavy wires to the strips and two thin wires to its coil.
- 4
Prove it is dead
Check your voltage tester on a live outlet. Then hold it to every wire on the sequencer and the heat kit's supply wires. It should stay quiet on every one. Check the tester on the outlet again after.
Tip. Now is the time to run the three tests above, before you buy anything.
Careful. If the tester beeps, stop. Something is still on. Find that breaker first.
- 5
Photograph and label every wire
Take a clear photo of the sequencer from straight on, so every terminal number and wire color shows.
Tape a label on each wire with the terminal number printed next to it on the sequencer.
- 6
Take out the old sequencer
Pull each wire off with needle-nose pliers, gripping the connector, not the wire.
Remove the two mounting screws and lift the sequencer out.
- 7
Match the new sequencer
Read the old part's label. The new one needs the same 24 V coil, the same number of switches and the same on and off delays. The part number, or your air handler's model number, is the surest match.
If your unit uses relays or a contactor instead, match the one that failed the same way: coil voltage and switch rating from its label.
Buy the part
Heat sequencer and heat relays
Opens Amazon in a new tab. Where’s my model number?
What to look for
- The part number on the old sequencer's label, or your air handler's model number.
- The same number of switches as the old one. There is usually one per heat strip.
- The same 24 V coil and the same on and off delays printed on the label.
Generic sequencers are sold as direct replacements for many units. They are a fair choice when the switch count, coil voltage and timings match the original.
- 8
Mount it and move the wires
Screw the new sequencer into the same spot.
Work from your labels and photo. Push each wire firmly onto the terminal with the same number. Loose connectors heat up and burn.
- 9
Close it up
Check that no wire rests on the heat strips or the blower. Put the blower door back on and screw it down.
- 10
Power on and test the heat
Take off your tags and turn the disconnect and every breaker back on.
Set the thermostat to emergency heat and turn it up. The strips come on in stages, so give it a few minutes. The air from the vents should get steadily warmer.
Set the thermostat back to normal heat when you are done.
Careful. If a breaker trips, leave it off and call a pro.
Buy the part
Get the right replacement
Buy the part
Heat sequencer and heat relays
Opens Amazon in a new tab. Where’s my model number?
What to look for
- The part number on the old sequencer's label, or your air handler's model number.
- The same number of switches as the old one. There is usually one per heat strip.
- The same 24 V coil and the same on and off delays printed on the label.
Generic sequencers are sold as direct replacements for many units. They are a fair choice when the switch count, coil voltage and timings match the original.
Know your limits
When to call a pro
Stop and call a pro if
- A heat breaker trips after one reset.
- You see smoke or scorching around the sequencer or its wires.
- The sequencer tests good and the strips still do not heat. The 24 V signal from the control board or thermostat needs a live check.
- A wire end is burned back and needs a new connector on a 240 V wire.
- You are not sure which breakers feed the heat kit, or the tester will not stay quiet.
FAQ
Heat sequencer and heat relays questions
How do I know if my heat sequencer is bad?
With the power off and proven dead, test its heater coil. OL means it is dead. Scorched terminals are another clue. If the coil reads fine, the sequencer may still not be getting its 24 V signal, which takes a live test.
Why do the heat strips not come on right away?
That is the sequencer doing its job. Its heater takes a little while to bend the bimetal strip, and each stage waits its turn, usually tens of seconds apart. A short delay is normal.
Can I use a universal sequencer?
Yes, if it has the same coil voltage, the same number of switches and the same timings as the original. Wire it terminal for terminal from your labels.
Is it the sequencer or the heat strips?
Test both with the power off. A heat strip with an open element or limit reads OL across it. A sequencer with an open coil reads OL across its coil. Our heat strip guide has the strip tests.
Related
Keep going
- SymptomAir handler heat strips not working: no backup or emergency heatHeat pump air handlers with electric heat strips only. The strips are the backup heat. When they do not come on, look first at their own breakers, then the sequencer, a burned-out strip, a tripped limit from low airflow, or the board.Open guide
- Air handler partElectric heat stripsAir handlers with electric heat only. The heat strips are coils of resistance wire on a rack inside the air handler. They back up the heat pump in cold weather and during defrost. When they fail, auxiliary and emergency heat stop working.Open guide
- Air handler partControl boardThe control board in an air handler takes the thermostat's signals and switches the blower and the electric heat. A blown fuse or a burned relay on it can stop the fan, the heat, or the whole system.Open guide
Get the next fix before it breaks
A short email when the seasons turn: filters to change, detector batteries to check, and new repair guides. No spam, unsubscribe any time.
We send it with Kit. Privacy