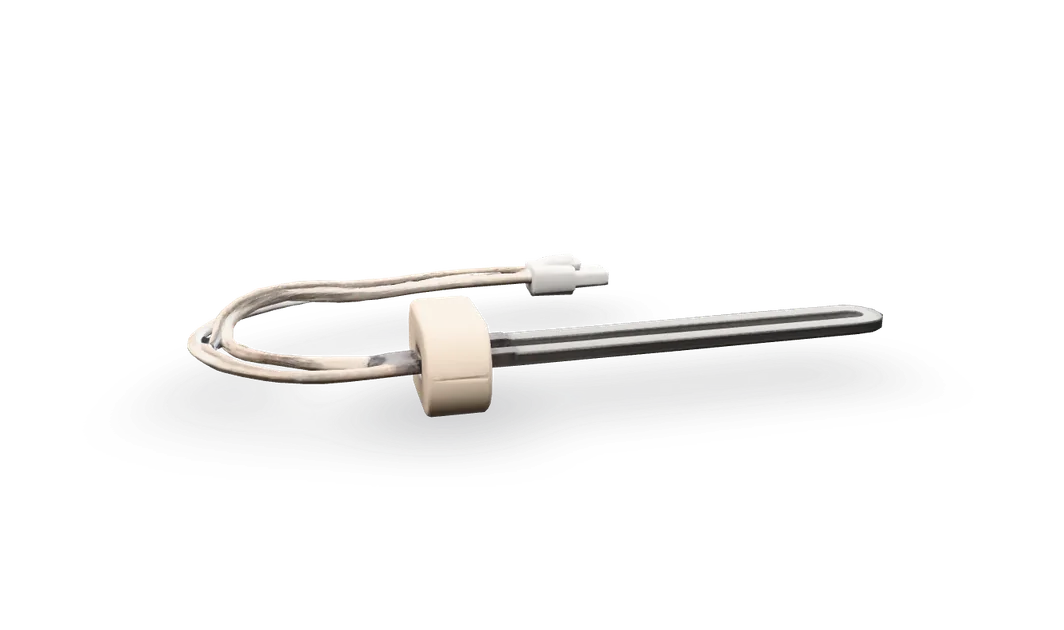
Furnace igniter replacement
Good news: this one is usually a 20-minute fix. One plug, one screw, and your furnace lights again.
- Difficulty
- Easy
- Time
- 15–30 min
- Typical part cost
- $15–$80Pro: $100–$300
- Tools
- 4See the list
One plug and one screw. The only trick is handling the new igniter without touching or bumping the element.
What it does
What the igniter does
The hot surface igniter is a small ceramic element that sits right in front of the first burner. When the furnace starts, the control board sends power to it and it heats up until it glows bright orange, hot enough to light gas on contact.
The board gives it a set warm-up time, anywhere from several seconds to under a minute depending on the igniter. Then the gas valve opens. Gas flows across the glowing igniter and lights. The igniter switches off and rests until the next cycle.
There are two common kinds. Flat silicon carbide igniters are the older style and the more fragile one. Silicon nitride igniters are usually smaller and round or flat-tipped, and they generally last longer.
Why it fails
Every heating cycle takes the igniter from room temperature to glowing and back. Over time the element can develop a hairline crack, and a cracked element cannot carry current. Furnaces that cycle on and off a lot wear them out faster.
They also fail early if the element gets touched or bumped. Manufacturers say to handle a new igniter only by its ceramic base or bracket, because the element is fragile and anything on your fingers can shorten its life.
High voltage at the house can burn igniters out early too. If new igniters keep failing, that is worth a pro's look.
Symptoms
Signs of a bad igniter
Clicks, but no flame
The inducer fan runs, you hear the gas valve click, but the burners never light. After a few tries the furnace gives up.
Full diagnosisNo orange glow
Look through the sight glass or the door louvers at start-up. A healthy igniter glows bright orange before the gas clicks on. A dead one stays dark.
A crack or bright line
With the power off, look at the element. A hairline crack, a chip or a burned spot means it is done, even if it still tests OK. While it glows, a crack can show up as a brighter line across the element.
A blinking error code
After a few failed tries the board locks out and flashes a code. On many boards that code points to a failure to light.
Full diagnosisBlowing cold air
If the thermostat fan is set to On, the blower keeps running even though the burners never light. The vents blow room-temperature air.
Full diagnosis
How to test it
Test the igniter before you buy
- Power off at the service switch or breaker, and let the burner area cool.
- Take off the upper door and find the igniter at the first burner. Shine a light on the element.
- Look along the whole element, front and back, for a hairline crack, a chip or a burned spot.
Cracks can be very fine. Turn your light at an angle and look twice. Do not touch the element while you look.
- Good
- Even color with no cracks, chips or burned spots. Move on to the resistance test.
- Bad
- Any crack, chip or burned spot. Replace the igniter. You can skip the meter test.
- Power off at the service switch or breaker.
- Hold a voltage tester to the igniter wires. It should stay quiet. Then unplug the igniter's two-wire connector.
- Touch one probe to each pin on the igniter side of the plug. Polarity does not matter.
- Wait for the number to settle before you read it.
A good igniter typically reads
About 6–120 Ω (120 V igniters)
Typical range. Check your part label or manual for the exact spec. The right number depends on the type and the exact part. Flat silicon carbide igniters often read about 40 to 90 Ω. Silicon nitride ones vary more, and many read lower. A 24 V igniter reads only a few ohms, so this range does not apply to it.
- Good
- A steady reading in the range for your igniter's part number means the element is intact. If it also looks clean with no cracks, the igniter is probably not your problem.
- Bad
- OL means the element is open. A reading near 0 Ω, or one far outside the range for your part, also means replace it.
Safety first
Before you touch anything
- 1
Kill the power
Flip the furnace service switch off, or turn off its breaker. The control board light should go dark. Before you unplug the igniter, check its wires with a voltage tester. Try the tester on a working outlet first so you know it works.
- 2
Close the gas shutoff
Turn the handle on the gas line a quarter turn so it sits crosswise to the pipe. You will not open any gas fittings in this job. This is just a second layer of safety.
- 3
Let it cool
If the furnace just tried to run, give the burner area a few minutes to cool before you reach in.
Wait about 10 min
Tools you'll need
Grab these first
Tool and part links are affiliate links. We may earn a commission at no extra cost to you, and it never changes what we tell you to check first. How this works
- Nut driver1/4 in. hexThe igniter bracket and most furnace door screws are 1/4 in. hex heads.Typically $6–$15Shop this tool
- Digital multimeterΩ, V, µF, µAConfirms the old igniter is dead before you spend money on a new one.Typically $25–$60Shop this tool
- Non-contact voltage testerPen styleConfirms there is no power at the igniter wires before you unplug them.Typically $15–$30Shop this tool
- HeadlampThe igniter sits back behind the burners. Both hands free helps.Typically $12–$30Shop this tool
- Nitrile glovesOptionalKeeps your fingers off the new element.Typically $8–$15Shop this tool
Step by step
How to replace the igniter
- 1
Shut off the power and the gas
Flip the service switch on or near the furnace to off. It looks like a light switch. If you cannot find one, turn off the furnace breaker.
Then turn the gas shutoff handle a quarter turn so it sits crosswise to the pipe.
Tip. Not sure the power is off? Turn the thermostat up. Nothing should start, and the status light on the control board should stay dark.
- 2
Take off the upper door
The upper door covers the burner compartment. Most lift up and pull away. Some have two screws along the top edge.
Set the door somewhere it will not get stepped on.
- 3
Find the igniter
Look at the row of burners. The igniter is mounted at one end, with its tip sitting right in front of the first burner. Two wires run from it to a plastic plug.
Do not confuse it with the flame sensor at the other end. That one is a single bare metal rod with one wire.
Tip. Take a photo now. It is your reference for how the new one should sit.
- 4
Unplug the igniter
Hold the voltage tester to the two wires. It should stay quiet. If it beeps or lights, stop and find the right breaker.
Follow the two wires back to the plug and pull the two halves apart. Squeeze the locking tab if there is one.
Pull on the plug body, not the wires.
- 5
Remove the mounting screw
One screw holds the igniter bracket, usually a 1/4 in. hex head. Back it out with the nut driver and keep it. The new igniter may not come with one.
Tip. Hold the bracket with your other hand as the screw comes free so the igniter does not drop.
- 6
Slide the old igniter out
Ease the igniter straight out, keeping the element clear of the burner and the bracket opening. If it is already cracked it may crumble, and that is fine.
- 7
Match the new igniter
Hold the old and new igniters side by side. The bracket, the plug and the length of the element should all match. A universal kit comes with adapter brackets and plugs for this. Follow the kit's own instructions.
The element has to end up in the same spot in front of the burner as the old one.
Careful. Do not touch the element. Handle the igniter by the ceramic base or the bracket only.
Buy the part
Hot surface igniter
Opens AppliancePartsPros in a new tab. Where’s my model number?
What to look for
- The part number printed on the old igniter's ceramic base or its wire tag.
- The same voltage. Most furnace igniters run on 120 V, but not all of them. Match the voltage marked on the old igniter or in your manual.
- The same plug and bracket, or a universal kit that lists your original part number or furnace model as compatible.
Universal silicon nitride kits fit many furnaces, but not every one. Only use a kit that lists your original part number or furnace model, and follow its instructions exactly.
- 8
Install the new igniter
Slide the new igniter in the same way the old one came out. Check it against your photo. The tip should sit in front of the first burner without touching it or any other metal.
Line up the bracket and snug the screw. Firm is enough. Overtightening can crack the ceramic.
- 9
Plug it in
Push the plug together until it clicks. Tuck the wires so they are not resting on the burners or any hot metal.
- 10
Put the door back on
Refit the upper door. Many furnaces will not run unless the doors are seated, because a door switch cuts power when one is off.
- 11
Turn it back on and watch it light
Turn the gas shutoff handle back in line with the pipe, then flip the power on. Set the thermostat a few degrees above room temperature.
Watch through the sight glass or the door louvers. You should hear the inducer start, see an orange glow, then hear a click and a soft whoosh as the burners light.
Buy the part
Get the right replacement
Buy the part
Hot surface igniter
Opens AppliancePartsPros in a new tab. Where’s my model number?
What to look for
- The part number printed on the old igniter's ceramic base or its wire tag.
- The same voltage. Most furnace igniters run on 120 V, but not all of them. Match the voltage marked on the old igniter or in your manual.
- The same plug and bracket, or a universal kit that lists your original part number or furnace model as compatible.
Universal silicon nitride kits fit many furnaces, but not every one. Only use a kit that lists your original part number or furnace model, and follow its instructions exactly.
Know your limits
When to call a pro
Stop and call a pro if
- You smell gas at any point. Do not touch any switches. Leave the house and call your gas utility from outside.
- Your carbon monoxide alarm goes off. Get everyone outside to fresh air, then call 911 or the fire department from outside.
- The igniter glows but the burners still do not light. That points to gas supply, the gas valve or the burners.
- The burners light late with a bang or a puff of flame.
- New igniters keep failing within weeks or months. The supply voltage or the control board may be the real cause.
- You see scorch marks, melted wires or flame rolling out around the burners.
- The igniter cannot be reached without removing the burners or the gas manifold.
FAQ
Hot surface igniter questions
How do I know if it is the igniter or the flame sensor?
Watch a start-up. If there is no orange glow and no flame at all, suspect the igniter. If the burners light and then go out a few seconds later, suspect the flame sensor.
If the inducer runs but the igniter never even gets a chance to glow, look at the pressure switch first.
How long does a furnace igniter last?
There is no single number. Silicon nitride igniters generally outlast the older silicon carbide ones, and furnaces that cycle on and off a lot wear them out faster.
Can I use a universal igniter?
Often, yes. Universal kits include several brackets and plugs. Check that the kit lists your original part number or furnace model, and that the voltage matches. If it does not list yours, buy the exact part.
The igniter glows but the furnace will not light. Is the igniter bad?
Can I light the burners by hand while I wait for the part?
No. Furnace operating labels are clear that an automatic igniter lights the burners and you must never try to light them by hand. Wait for the new igniter.
Related
Keep going
- SymptomFurnace clicks but won't igniteThe inducer runs and the gas valve clicks, but the burners never light. After a few tries the furnace locks out. The usual culprit is a cracked igniter.Open guide
- SymptomFurnace control board blinking an error codeThe light on the control board flashes a code when something fails. Count the flashes, match them to the chart inside the blower door, and write the code down before you reset anything.Open guide
- SymptomFurnace blowing cold airThe vents blow, but the air is cool or room temperature. Often the thermostat fan is set to On. Otherwise the burners are not lighting, or are shutting down early.Open guide
- Furnace partFlame sensorThe flame sensor is a thin metal rod that proves the burners are really lit. A dirty one is a classic reason a furnace lights and then shuts off seconds later. Cleaning it, or swapping it, is a one-screw job.Open guide
- Furnace partPressure switchThe pressure switch proves the inducer fan is pulling exhaust out before the furnace is allowed to light. When it stays open, the inducer runs and nothing else happens. Often the real fix is a clear hose or vent.Open guide
- Furnace partControl boardThe control board runs the furnace's start-up sequence and flashes a code when something fails. Read the blink code first, because most codes point at a part the board is reporting on.Open guide