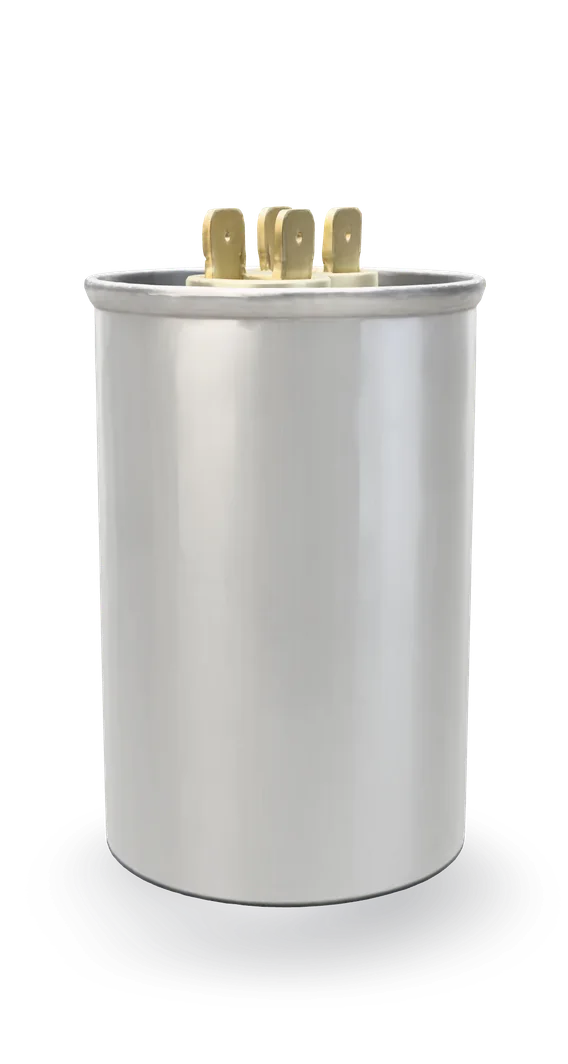
Air handler blower capacitor: test and replace
Blower humming but not spinning? Before you price a new motor, check this small metal can. It is cheap, it fails often, and it swaps out in well under an hour once the power is proven off.
- Difficulty
- Easy
- Time
- 20–45 min
- Typical part cost
- $10–$50Pro: $80–$400
- Tools
- 6See the list
Two wires and one strap. The rating is for the safety work: an air handler with heat strips can have more than one power supply, and a capacitor can hold a charge after the power is off.
What it does
What the capacitor does
Many air handler blowers use a PSC motor, short for permanent split capacitor. It needs a capacitor wired to it to start turning and to run properly. The capacitor is a round or oval metal can held by a strap on or near the blower, with two wires on top.
The capacitor shifts the timing of the power going to one of the motor's windings. That gives the motor a push in the right direction when it starts, and keeps it running smoothly.
Not every air handler has one. ECM motors, also called variable-speed or constant-torque motors, have an electronic module on the motor and do not use a run capacitor.
Why it fails
Capacitors wear out over time. A weak one reads below the µF number on its label, and at some point the motor no longer gets enough of a push to start.
Sometimes they fail more visibly. A failed capacitor can swell at the top, dent or leak oil. Any of those means it is finished.
Symptoms
Signs of a bad capacitor
Blower hums but will not start
You hear a steady hum from the blower compartment, but no air comes out of the vents. This is the classic weak capacitor.
Full diagnosisSlow start, or it needs a nudge
The blower takes a while to get up to speed, or only starts after the wheel is given a spin. The capacitor is too weak to give it a proper start.
Swollen top or oily can
With the power off, look at the capacitor. A domed or bulged top, dents or oily residue mean it has failed. Replace it.
No air at the vents, heating or cooling
The thermostat is calling, but nothing comes out of the vents because the blower motor is not turning. Check the capacitor before the motor.
Full diagnosis
How to test it
Test the capacitor before you buy
- Turn off the thermostat, every breaker for the air handler and the disconnect. Take off the blower door and prove the power is off with a voltage tester.
- Find the capacitor: a round or oval metal can with two terminals on top, held by a strap on or near the blower.
- Look at it without touching the terminals. Check the top, the sides and the area underneath.
- Good
- A flat top, no dents, and no oil or residue. It can still be weak inside, so do the meter test next.
- Bad
- A domed or bulged top, a dent or oily residue. Replace it. Never test a capacitor with the power on, and do not put power back on to a damaged one.
- Power off and proven off. Discharge the capacitor first, as shown in the steps below.
- Label and pull both wires off the capacitor.
- Set the meter to capacitance. Touch one probe to each terminal and hold them there until the number settles.
- Compare the reading with the µF rating printed on the capacitor's label.
A good capacitor typically reads
Within the tolerance on its label, often ±5% or ±6%
Typical range. Check your part label or manual for the exact spec. Test with the wires off the capacitor so nothing else in the circuit affects the reading.
- Good
- The reading lands within the tolerance printed on the label. Many run capacitors are rated ±5% or ±6%. If it reads in that band, the capacitor is not your problem.
- Bad
- It reads below the label's tolerance band, reads zero, or the meter shows OL or will not settle. Replace it. One major maker's service manual says to replace a capacitor that is more than 10 percent off its rated value.
Safety first
Before you touch anything
- 1
Every breaker, the disconnect, then prove it
Set the thermostat to off. An air handler with heat strips runs on 240 V and often has two breakers or a double breaker in the panel, plus a disconnect beside the unit, and some heat kits have breakers of their own. Turn all of them off. Then check with a voltage tester at the unit before you touch anything. Try the tester on a working outlet first.
- 2
Discharge the capacitor
A capacitor can hold a charge after the power is off, and touching its terminals can shock you. Bleed it with a discharge tool across the terminals, then confirm close to zero on a meter set to DC volts. Never use your fingers or a bare screwdriver.
- 3
Never test it powered
Only check a capacitor with the power off. A damaged one can burst if power is applied.
Tools you'll need
Grab these first
Tool and part links are affiliate links. We may earn a commission at no extra cost to you, and it never changes what we tell you to check first. How this works
- Non-contact voltage testerPen styleProves the power is off at the air handler before you reach in. Check it on a working outlet first.Typically $15–$30Shop this tool
- Capacitor discharge toolBleeds the stored charge off the capacitor before you touch its terminals.Typically $10–$25Shop this tool
- Digital multimeterΩ, V, µF, µAReads the capacitor's value in microfarads (µF), and confirms it is discharged on DC volts. Your meter needs a capacitance setting.Typically $25–$60Shop this tool
- Nut driver1/4 in. hexBlower door screws and most capacitor strap screws are 1/4 in. hex heads.Typically $6–$15Shop this tool
- Nut driver5/16 in. hexOptionalThe other common size on air handler panels.Typically $6–$15Shop this tool
- Needle-nose pliersPulls the push-on terminals straight off without bending the tabs.Typically $8–$20Shop this tool
- Painter's tape and markerLabel each wire with the terminal it came from.Typically $5–$12Shop this tool
Step by step
How to replace the capacitor
- 1
Turn off the thermostat, the breakers and the disconnect
Set the thermostat to off.
At the panel, turn off every breaker that feeds the air handler. With heat strips there are often two breakers or one double breaker. Then switch off the disconnect beside the unit. If the heat kit has its own breakers on the unit, turn those off too.
- 2
Take off the blower door
The upper door covers the blower and the controls. Remove its screws and lift it off.
Set the screws somewhere safe. The door has to go back on before the unit runs.
- 3
Prove the power is off
Check your voltage tester on a working outlet so you know it works.
Hold it to the power wires where they come into the air handler's electrical box, and to the capacitor's wires. It should stay quiet everywhere.
If it beeps or lights anywhere, stop. Something is still on. Find the other breaker or disconnect before you go on.
Careful. Do not trust one breaker. On a unit with heat strips, another circuit can still be live inside the cabinet.
- 4
Find the capacitor
Look on or near the blower housing for a metal can held by a strap or bracket, with two wires on top.
If the motor has an electronic module on it and there is no can anywhere, you have an ECM motor. It has no capacitor, so this guide does not apply.
Tip. Take a photo of the label and the wires now. You will want both later.
- 5
Discharge it safely
Hold the discharge tool by its insulated handle only. Touch its two leads across the two capacitor terminals and hold them there for a few seconds.
Then set your meter to DC volts and check across the terminals. It should read close to zero. If it does not, bleed it again and recheck before you touch anything.
Careful. Do not short the terminals with a bare screwdriver, and never touch the terminals with your hands. Stored charge can shock you even with the power off.
- 6
Label and pull the wires
Put a strip of tape on each wire and write the terminal it came from. Take a photo too.
Grip each push-on terminal with the needle-nose pliers and pull it straight off. Do not pull on the wire itself.
- 7
Loosen the strap and remove it
Back out the screw on the strap or bracket that holds the capacitor. Slide the old capacitor out.
Read its label carefully. You need the µF rating, the voltage rating and the shape.
- 8
Match the new capacitor
The new capacitor must have the same µF rating as the old one. The motor's label usually lists it too.
The voltage rating must be the same or higher, never lower. A 440 V capacitor can replace a 370 V one, but not the other way around.
Get a run capacitor, not a start capacitor, in a shape and size that fits the strap.
Buy the part
Blower motor run capacitor
Opens Amazon in a new tab. Where’s my model number?
What to look for
- The same µF rating as the old capacitor or the motor label. Do not guess or round it.
- The same voltage rating or higher. 370 V and 440 V are the common ratings.
- The same shape, round or oval, and a size that fits the strap.
- A run capacitor, not a start capacitor. They are not interchangeable.
Generic run capacitors are fine here as long as the µF rating matches and the voltage rating is the same or higher. The air handler does not care who made it.
- 9
Mount it and reconnect the wires
Slide the new capacitor into the strap and snug the screw.
Using your labels, push each wire onto the matching terminal. Each one should feel snug. Keep the wires clear of the blower wheel.
- 10
Close up and test
Refit the blower door and all its screws before you turn anything back on.
Switch the disconnect and the breakers back on. Set the thermostat fan to ON. The blower should start promptly and run quietly. Then set the fan back to AUTO.
Tip. Still humming with a new capacitor? Power off, prove it off, and check that the wheel spins freely by hand. If it does, look at the blower motor next.
Buy the part
Get the right replacement
Buy the part
Blower motor run capacitor
Opens Amazon in a new tab. Where’s my model number?
What to look for
- The same µF rating as the old capacitor or the motor label. Do not guess or round it.
- The same voltage rating or higher. 370 V and 440 V are the common ratings.
- The same shape, round or oval, and a size that fits the strap.
- A run capacitor, not a start capacitor. They are not interchangeable.
Generic run capacitors are fine here as long as the µF rating matches and the voltage rating is the same or higher. The air handler does not care who made it.
Know your limits
When to call a pro
Stop and call a pro if
- Your voltage tester still shows power after you have turned off every breaker and disconnect you can find.
- You see scorch marks, melted terminals or burned wires around the capacitor, the blower or the heat strips.
- The motor has no capacitor and an electronic module on it. That is an ECM motor, and it is diagnosed differently.
- A new capacitor does not fix it and the wheel spins freely by hand. The motor or the control board may be the problem.
- The new capacitor fails again within weeks.
- You are not comfortable proving the power off or discharging a capacitor.
FAQ
Blower motor run capacitor questions
Is it the capacitor or the blower motor?
Start with the capacitor. It is far cheaper and easier to test. A blower that hums but will not start is very often a weak capacitor. If the new capacitor tests good and the motor still hums, check the blower motor.
Is this the same capacitor as the one in my outdoor unit?
No. The outdoor unit usually has its own dual capacitor for the compressor and the outdoor fan. The air handler's blower capacitor is a separate, smaller part inside the indoor unit. See the outdoor unit capacitor guide for that one.
Can I use a capacitor with a higher voltage rating?
Yes. A 440 V capacitor can replace a 370 V one. Never go lower than the original. The µF rating, on the other hand, must match.
Why do I need to turn off more than one breaker?
Air handlers with electric heat strips draw a lot of power, so they may be fed by more than one breaker, and some heat kits have their own. Air handler manuals warn that more than one power source may be present. Turn them all off and prove it with a tester at the unit.
My air handler does not seem to have a capacitor. Why?
Your blower probably has an ECM motor. You can spot it by the electronic module on the motor. Those motors do not use a run capacitor.
Related
Keep going
- SymptomAir handler not blowing air: no airflow from the ventsThe blower inside the air handler is not moving air. A humming motor that never spins points to the run capacitor. Silence points to power, the blower door switch, a tripped float switch, the board or the motor. Ice on the coil can also block the air.Open guide
- SymptomAir handler coil frozen: ice on the evaporator coil or linesThe indoor coil has iced over, so little or no cool air reaches the vents. Turn the system off or to fan only and let it thaw. Then check the filter, the return grilles and the blower. If it keeps freezing, low refrigerant is a job for a certified pro.Open guide
- Air handler partBlower motor and wheelFor heat pump and central air handlers, including units with electric heat strips. The blower motor spins a squirrel-cage wheel that pulls air through the filter and coil and pushes it into the ducts. A dirty wheel chokes airflow, and a worn motor hums, squeals or stops.Open guide
- Air handler partControl boardThe control board in an air handler takes the thermostat's signals and switches the blower and the electric heat. A blown fuse or a burned relay on it can stop the fan, the heat, or the whole system.Open guide
- Air handler partAir filterFor heat pump and central air handlers, including units with electric heat strips. The filter cleans the air before it reaches the blower and coil. A clogged one chokes airflow, which can freeze the coil in summer and trip the heat strips in winter. Check it monthly.Open guide
Get the next fix before it breaks
A short email when the seasons turn: filters to change, detector batteries to check, and new repair guides. No spam, unsubscribe any time.
We send it with Kit. Privacy