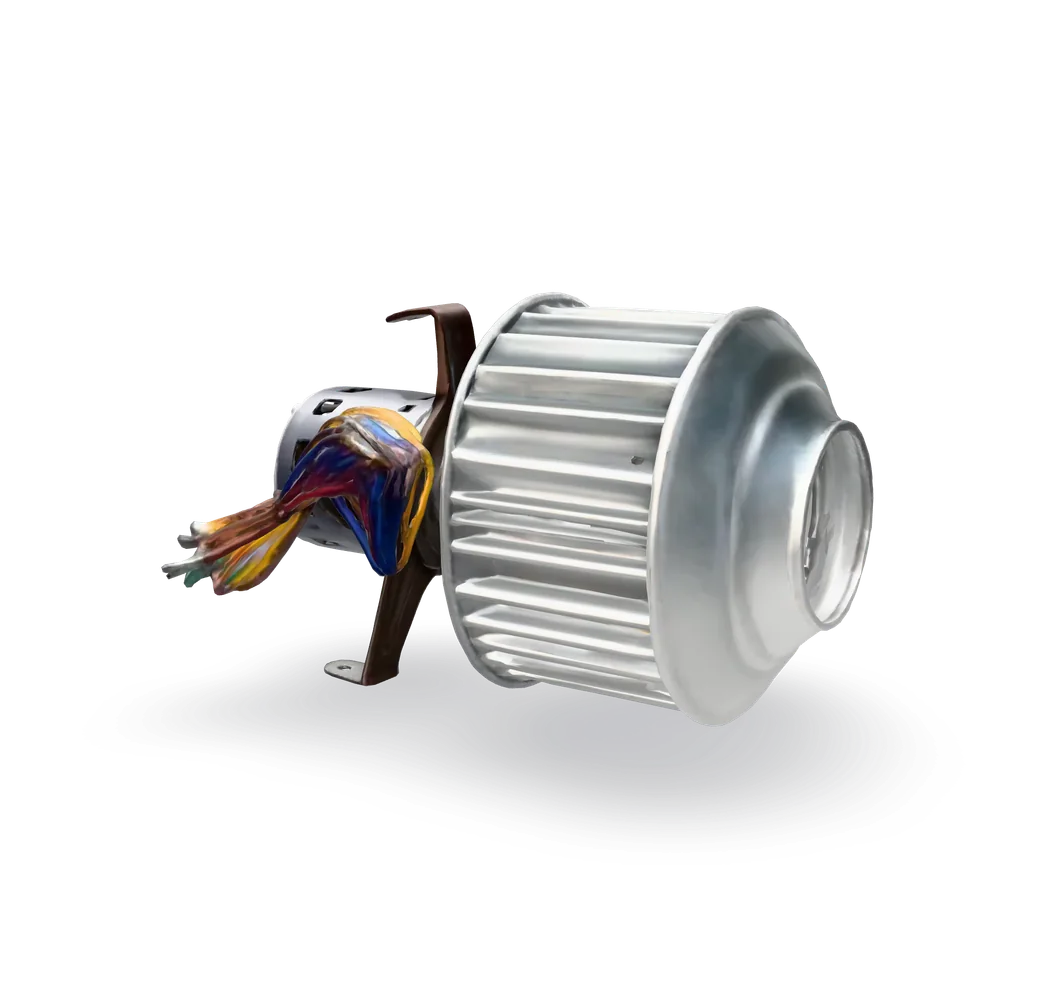
Air handler blower motor and wheel: clean or replace
No air from the vents, or a blower that hums, squeals or crawls? Check the filter and the capacitor first. Both are cheap. If the motor really is done, the swap is a solid afternoon job with the power proven off.
- Difficulty
- Moderate
- Time
- 1 hr–2.5 hr
- Typical part cost
- $150–$450Pro: $350–$1,200
- Tools
- 12See the list
The blower slides out, but it is bulky, the wires need careful labeling, and the cabinet also holds 240 V heat strip wiring. Some air handler makers list everything except the filter as technician work. An ECM motor is best left to the exact factory part or a pro.
What it does
What the blower motor does
The blower sits behind the blower door, above the coil on an upflow unit. It is a motor inside a wide, drum-shaped fan wheel, called a squirrel cage, in a sheet metal housing that slides in on rails or a shelf.
It runs in both seasons. In cooling it pulls house air across the cold coil. In heating it moves air across the coil and, when they are on, the electric heat strips. Without it, nothing reaches the vents.
Air handlers use one of two motor types. A PSC motor has a separate run capacitor nearby and a few colored speed wires. An ECM motor, also called variable-speed or constant-torque, has an electronic module on the motor and uses no capacitor.
Why it fails
Dust is the first problem. Whatever gets past the filter collects on the wheel blades and the motor. A dirty wheel moves less air, and dust packed on the motor can make it run hot.
Wear is the second. As the bearings age, the motor can squeal, hum or turn slowly, and eventually stop.
On PSC motors, a weak capacitor is a common reason a blower hums and will not start. Check the run capacitor first. It is cheap and quick.
Symptoms
Signs of a bad blower motor
No air from the vents
The thermostat is calling, but no air comes out of the vents. The blower is not turning.
Full diagnosisHums but does not spin
A steady hum from the blower compartment, but the wheel does not turn or turns very slowly. On a PSC motor, test the capacitor first.
Full diagnosisWeak airflow with a clean filter
Air comes out, but barely. A dirty blower wheel is a common reason.
Squealing, grinding or rattling
A squeal or grind that follows the motor points to the bearings. A rattle often means a loose wheel, a loose mount or something caught in the housing.
Backup heat cuts out
The heat strips need airflow. When the blower fails, their limit switch opens and shuts them off.
Full diagnosis
How to test it
Test the blower motor before you buy
- Turn off the thermostat, every breaker for the air handler and the disconnect. Take off the blower door and prove the power is off with a voltage tester.
- Reach in and turn the wheel by hand. On some units you can reach it from the front. On others you see it best once the blower is out.
- Rock the wheel gently and feel for play or rubbing on the housing.
- Shine a light between the blades to see how much dust is on them.
- Good
- The wheel spins freely and coasts. No grinding, no wobble, no rubbing. If it is clean too, check the [run capacitor](/air-handler/run-capacitor) and the control board next.
- Bad
- It drags, grinds or will not turn: the motor is likely worn out. It wobbles or rubs: the wheel is loose or off center. Dust packed on the blades: clean the wheel.
- If a round or oval metal can is strapped near the motor, it is a PSC motor with a run capacitor.
- A blower that hums but will not start is often a weak capacitor, not a dead motor.
- Follow the run capacitor guide to discharge it safely and test it before you buy a motor.
- Good
- The capacitor tests within its label's tolerance. Look at the motor, the wheel and the control board.
- Bad
- It reads low, or the can is bulged or leaking. Replace the capacitor and try the blower again before you replace the motor.
Safety first
Before you touch anything
- 1
Every breaker, the disconnect, then prove it
Set the thermostat to off. An air handler with heat strips runs on 240 V and often has two breakers or a double breaker in the panel, plus a disconnect beside the unit, and some heat kits have breakers of their own. Turn all of them off. Then check with a voltage tester at the unit before you touch any wire.
- 2
Discharge the capacitor, or wait out an ECM
A PSC motor's run capacitor can hold a charge after the power is off. Bleed it with a discharge tool and confirm close to zero on DC volts. An ECM motor's module stores charge too, so wait at least 5 minutes after the power goes off before you unplug it.
- 3
Mask and gloves
Wear a dust mask for the cleaning and gloves for the whole job. The housing edges and blades are sharp.
Tools you'll need
Grab these first
Tool and part links are affiliate links. We may earn a commission at no extra cost to you, and it never changes what we tell you to check first. How this works
- Non-contact voltage testerPen styleProves the power is off at the air handler before you touch any wire. Check it on a working outlet first.Typically $15–$30Shop this tool
- Nut driver1/4 in. hexBlower door and housing screws are often 1/4 in. hex heads.Typically $6–$15Shop this tool
- Nut driver5/16 in. hexThe other common size on blower housings.Typically $6–$15Shop this tool
- Socket set1/4 in. drive, with extensionReaches the motor mount bolts and the wheel's hub bolt.Typically $20–$45Shop this tool
- Hex key setSAE, L-shapedSome blower wheels lock to the shaft with a hex socket set screw.Typically $8–$20Shop this tool
- Capacitor discharge toolBleeds any charge off a PSC motor's run capacitor before you handle its wires.Typically $10–$25Shop this tool
- Digital multimeterΩ, V, µF, µAConfirms the capacitor reads close to zero on DC volts after you bleed it.Typically $25–$60Shop this tool
- Painter's tape and markerLabel every blower wire before it comes off the control board.Typically $5–$12Shop this tool
- Stiff nylon brushScrubs dust off the wheel blades without bending them.Typically $5–$12Shop this tool
- Shop vacuumPulls the loosened dust out of the wheel and the housing.Typically $40–$90Shop this tool
- Dust maskN95Years of fine dust come off the wheel. Keep it out of your lungs.Typically $10–$25Shop this tool
- Work glovesHousing edges and wheel blades are sharp.Typically $8–$20Shop this tool
Step by step
How to clean or replace the blower motor and wheel
- 1
Turn off the thermostat, the breakers and the disconnect
Set the thermostat to off.
At the panel, turn off every breaker that feeds the air handler. With heat strips there are often two breakers or one double breaker. Then switch off the disconnect beside the unit, and any breakers on the heat kit itself.
- 2
Take off the blower door
Remove the screws on the upper door that covers the blower and the controls, and lift it off.
Keep the screws together. The door has to be back on and secured before the unit runs.
- 3
Prove the power is off
Check your voltage tester on a working outlet so you know it works.
Hold it to the power wires where they come into the air handler's electrical box, to the blower motor wires and to the heat strip wiring. It should stay quiet everywhere.
If it beeps or lights anywhere, stop. Find the other breaker or disconnect before you go on.
Careful. Do not trust one breaker. On a unit with heat strips, another circuit can still be live inside the cabinet.
- 4
Discharge the capacitor
If the motor has a run capacitor, hold the discharge tool by its insulated handle and touch its leads across the capacitor's terminals for a few seconds. Then check across the terminals with your meter on DC volts. It should read close to zero.
An ECM motor has no separate capacitor, but its module holds a charge for a few minutes. Wait at least 5 minutes after the power goes off before you unplug it, and never open the module.
Careful. Never short a capacitor with a bare screwdriver or touch its terminals. The run capacitor guide shows the safe method in detail.
- 5
Photograph and label the wires
Take a clear photo of the control board and the motor wiring. Follow each blower wire from the motor to where it connects, and tape a label on it with the terminal it came from.
Label the capacitor wires too. Then unplug the motor's connectors, holding each one by its body, not the wire.
Tip. Unused speed wires often park on spare terminals. Label those too. They go back to the same spot.
- 6
Remove the blower mounting screws
The blower housing is held to its shelf or rails by a few screws at the front. Remove them and keep them.
If any wiring channel or bracket is screwed across the front of the blower, unscrew it and set it aside with its wires attached.
Tip. Layouts differ from one air handler to the next. If your manual or the diagram inside the door shows how the blower comes out, follow that.
- 7
Slide the blower out
Support the housing with one hand and carefully slide the whole blower straight out through the front. It is heavy and awkward, so take its weight as it clears the cabinet.
Set it on a towel or cardboard with the wheel opening facing you. Watch the wires as it comes out so nothing catches.
- 8
Clean the wheel and housing
Put on the dust mask. Work the brush into the blades and vacuum the dust out as you go. Turn the wheel by hand to reach every blade.
Vacuum the inside of the housing and the motor's cooling vents. Dust packed on the motor makes it run hot.
Some wheels have small metal balance clips on the blades. Leave them exactly where they are, and do not bend or drop the wheel.
Tip. Cleaning only? Skip ahead to the step where the blower goes back in.
Careful. Do not soak the motor or spray water into it.
- 9
Separate the motor from the wheel
Replacing the motor? Find the bolt or set screw on the wheel's hub, where it grips the motor shaft. Mark the shaft so you know where the wheel sat, then loosen it.
Note which way the motor's wiring connections face. Remove the bolts that hold the motor mount to the housing and slide the motor out of the wheel. Keep a band-style mount; many replacement motors reuse it.
- 10
Match and fit the new motor
Read the old motor's label. A replacement PSC motor should match its horsepower, voltage, rotation direction, frame and shaft size, and number of speeds. Fit a new capacitor of the size the new motor's label calls for.
ECM motors come in different types. Some replacements are pre-programmed, but they still have to match the motor type, horsepower and voltage, and some need a technician to set and check airflow. Order the part listed for your air handler model, or call a pro.
Fit the new motor into the mount, with its connections facing the same way as the old one, and slide it into the wheel to your mark. Center the wheel in the housing, tighten the hub bolt on the flat of the shaft, and bolt the mount back in.
Tip. One air handler maker says the motor's connections must face down so water cannot collect inside the motor.
Buy the part
Blower motor and wheel
Opens Amazon in a new tab. Where’s my model number?
What to look for
- The motor's own label: horsepower, voltage, rotation, speeds, frame and shaft size. Match all of them.
- PSC or ECM. A motor with a module on it needs the replacement listed for your air handler model, or a pro.
- A new run capacitor sized to the new motor's label, if it is a PSC motor.
- The mounting style, such as a band mount or bolt-on arms, so it fits your blower housing.
Universal PSC replacement motors are a fair choice when they match the old motor's horsepower, voltage, rotation and frame, and mount in your housing. For ECM motors, stick to the replacement listed for your air handler.
- 11
Slide the blower back in
Spin the wheel by hand. It should turn freely and not rub the housing. Check that the hub bolt is tight.
Slide the blower back onto its rails or shelf the same way it came out. Put the front screws back in and snug them, and refit any bracket or wiring channel you moved.
- 12
Reconnect the wires
Using your labels and photo, connect each blower wire back to its terminal and the capacitor wires back to the capacitor. Each one should feel snug.
Tuck the wires so they cannot touch the wheel or the heat strips.
- 13
Close up and test
Refit the blower door with all its screws. Switch the disconnect and the breakers back on.
Set the thermostat fan to ON. The blower should start smoothly and quietly. Then set it back to AUTO and run a cooling or heating cycle.
Tip. Feel the airflow at a vent. After a cleaning it is often noticeably stronger.
Buy the part
Get the right replacement
Buy the part
Blower motor and wheel
Opens Amazon in a new tab. Where’s my model number?
What to look for
- The motor's own label: horsepower, voltage, rotation, speeds, frame and shaft size. Match all of them.
- PSC or ECM. A motor with a module on it needs the replacement listed for your air handler model, or a pro.
- A new run capacitor sized to the new motor's label, if it is a PSC motor.
- The mounting style, such as a band mount or bolt-on arms, so it fits your blower housing.
Universal PSC replacement motors are a fair choice when they match the old motor's horsepower, voltage, rotation and frame, and mount in your housing. For ECM motors, stick to the replacement listed for your air handler.
Know your limits
When to call a pro
Stop and call a pro if
- The motor has an electronic module on it (ECM) and you cannot get the replacement listed for your air handler.
- You see scorched wires, a burned smell or melted connectors at the control board, the blower or the heat strips.
- A new motor still trips a breaker.
- The wheel is cracked, the housing is rusted through, or the blower will not slide out without moving refrigerant lines or the coil. Those are licensed pro jobs.
- You are not sure which wire goes where. A wrong speed wire can change airflow.
- Your voltage tester still shows power after you have turned off every breaker and disconnect you can find.
FAQ
Blower motor and wheel questions
Is it the motor or the capacitor?
On a PSC motor, a blower that hums but will not start is often the capacitor. It is cheap and easy to test, so check it first. If the capacitor is good and the wheel spins freely by hand, the motor or the control board is next.
Can I do this myself, or is it a technician job?
Cleaning the wheel and swapping a matched PSC motor are within reach of a careful homeowner who proves the power off. Be aware that some air handler makers list everything except the filter as work for a certified technician, and an ECM motor often needs a technician to set airflow.
What is the difference between a PSC and an ECM motor?
A PSC motor is the older, simpler kind. It has a separate run capacitor and a few speed wires. An ECM motor has an electronic module on it and no capacitor. ECM replacements have to match the original type, and some need a technician to set them up, so buy the part listed for your air handler.
Why do my heat strips shut off when the blower does not run?
The strips need moving air to carry their heat away. Without it they overheat, and their limit switch opens to protect them. Fix the airflow and the strips can run again. See the heat strips guide.
Related
Keep going
- SymptomAir handler not blowing air: no airflow from the ventsThe blower inside the air handler is not moving air. A humming motor that never spins points to the run capacitor. Silence points to power, the blower door switch, a tripped float switch, the board or the motor. Ice on the coil can also block the air.Open guide
- SymptomAir handler heat strips not working: no backup or emergency heatHeat pump air handlers with electric heat strips only. The strips are the backup heat. When they do not come on, look first at their own breakers, then the sequencer, a burned-out strip, a tripped limit from low airflow, or the board.Open guide
- SymptomAir handler coil frozen: ice on the evaporator coil or linesThe indoor coil has iced over, so little or no cool air reaches the vents. Turn the system off or to fan only and let it thaw. Then check the filter, the return grilles and the blower. If it keeps freezing, low refrigerant is a job for a certified pro.Open guide
- Air handler partBlower motor run capacitorFor heat pump and central air handlers with a PSC blower motor, including units with electric heat strips. The run capacitor helps the blower motor start and run. A weak one leaves the blower humming, slow or dead. Air handlers with an ECM motor have no capacitor.Open guide
- Air handler partAir filterFor heat pump and central air handlers, including units with electric heat strips. The filter cleans the air before it reaches the blower and coil. A clogged one chokes airflow, which can freeze the coil in summer and trip the heat strips in winter. Check it monthly.Open guide
- Air handler partControl boardThe control board in an air handler takes the thermostat's signals and switches the blower and the electric heat. A blown fuse or a burned relay on it can stop the fan, the heat, or the whole system.Open guide
- Air handler partElectric heat stripsAir handlers with electric heat only. The heat strips are coils of resistance wire on a rack inside the air handler. They back up the heat pump in cold weather and during defrost. When they fail, auxiliary and emergency heat stop working.Open guide
Get the next fix before it breaks
A short email when the seasons turn: filters to change, detector batteries to check, and new repair guides. No spam, unsubscribe any time.
We send it with Kit. Privacy