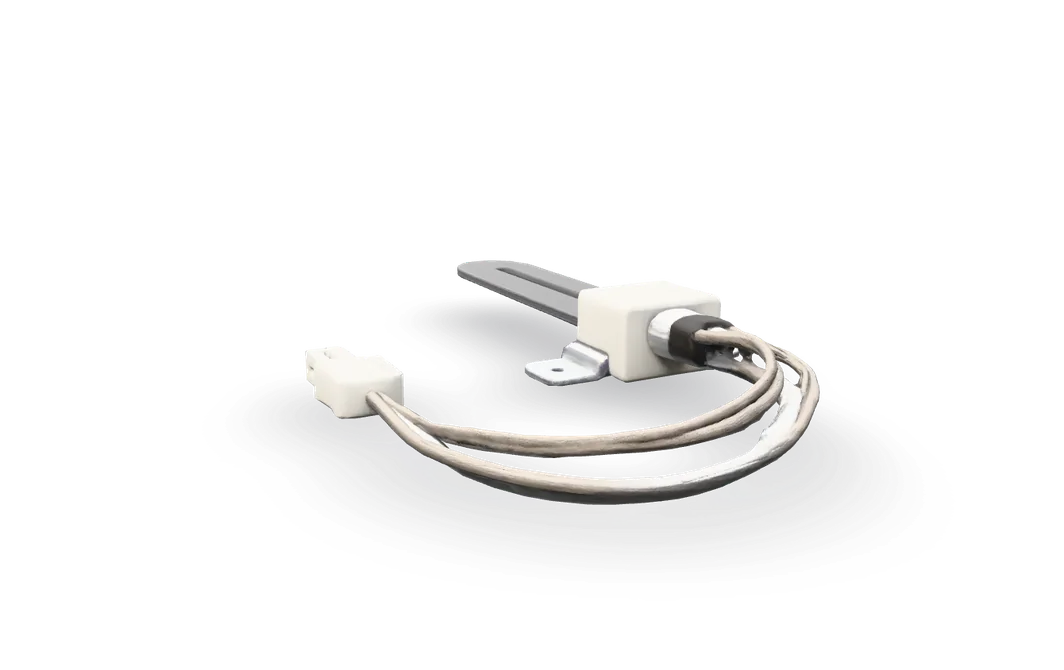
Gas dryer igniter test and replacement
Gas dryers only. If the igniter never glows, this is often a one-plug, one-screw swap you can do in under an hour.
- Difficulty
- Easy
- Time
- 30 min–1 hr
- Typical part cost
- $15–$85Pro: $95–$250
- Tools
- 3See the list
One plug and one screw on many dryers. The care is in handling the fragile element, and in stopping if your model makes you take the burner out.
What it does
What the igniter does
The igniter sits at the mouth of the burner, near the bottom of the dryer. When the dryer calls for heat, power flows through it and it heats up until it glows bright orange.
A flame sensor beside it watches for that heat. Once the igniter is hot enough, the sensor switches the gas valve fully open. Gas flows across the glowing igniter and lights.
Electric dryers do not have one. They heat with a heating element instead.
Why it fails
The element is ceramic and fragile. Over many heat cycles it can crack or burn open. A cracked or open igniter cannot carry current, so it never glows.
A new one can fail early if it gets bumped or touched. Service guides warn that the element breaks easily and that skin oils and dirt can shorten its life.
An igniter that is mounted crooked, or sits too far from the burner, may glow but still fail to light the gas.
Symptoms
Signs of a bad igniter
Tumbles, but no heat at all
The drum turns and the blower runs, but the air stays cold for the whole cycle.
Full diagnosisNo orange glow
A healthy igniter glows bright orange at the start of every heat cycle, before the gas lights. A dead one stays dark, and the burner never lights.
A crack or burned spot
With the dryer unplugged, look at the element. A hairline crack, a chip or a burned spot means it is done.
Lights, then keeps going out
A cracked igniter can sometimes light the gas and then fail on the next try. This sign has several possible causes, so test before you buy.
Full diagnosis
How to test it
Test the igniter before you buy
- Unplug the dryer and close the gas shutoff behind it.
- Take off the lower access panel and find the igniter at the mouth of the burner.
- Shine a light along the whole element, front and back. Do not touch it.
Cracks can be very fine. Turn your light at an angle and look twice.
- Good
- Even color with no cracks, chips or burned spots. Move on to the resistance test.
- Bad
- Any crack, chip or burned spot. Replace the igniter.
- Make sure the dryer is unplugged.
- Unplug the igniter's two-wire connector. Pull on the plug body, not the wires.
- Touch one probe to each pin on the igniter side of the plug. Polarity does not matter.
- Let the number settle before you read it. The igniter should be at room temperature.
A good igniter typically reads
About 50–400 Ω
Typical range. Check your part label or manual for the exact spec. The right number depends on the igniter, and the reading shifts with room temperature. Some service sheets allow up to about 500 Ω, and one older igniter type up to about 800 Ω. Check the tech sheet for your model before you call a reading bad.
- Good
- A steady reading in the range for your igniter means the element is intact. If it also looks clean and uncracked, look at the [flame sensor](/dryer/flame-sensor) next.
- Bad
- OL or no reading means the element is open. Replace it.
Safety first
Before you touch anything
- 1
Unplug the dryer
Pull the dryer's plug from the wall before you remove any panel. Turning the dial to off is not enough.
- 2
Close the gas shutoff
The shutoff is on the gas line behind the dryer. Turn the handle a quarter turn so it sits crosswise to the pipe. You will not open any gas fittings in this job. This is a second layer of safety.
- 3
Let it cool
If the dryer just ran, give the burner area several minutes to cool before you reach in.
Wait about 10 min
Tools you'll need
Grab these first
Tool and part links are affiliate links. We may earn a commission at no extra cost to you, and it never changes what we tell you to check first. How this works
- Multi-bit screwdriverPhillips, flat, squareThe lower access panel and the igniter mounting screw are usually Phillips or 1/4 in. hex.Typically $10–$25Shop this tool
- Nut driver1/4 in. hexOptionalMany igniter mounting screws are 1/4 in. hex heads.Typically $6–$15Shop this tool
- Digital multimeterΩ, V, µF, µAConfirms the old igniter is open before you buy a new one.Typically $25–$60Shop this tool
- HeadlampThe burner sits low and deep in the cabinet.Typically $12–$30Shop this tool
- Nitrile glovesOptionalKeeps your fingers off the new element.Typically $8–$15Shop this tool
Step by step
How to replace the igniter
- 1
Unplug the dryer and close the gas
Pull the dryer far enough from the wall to reach the plug and the gas shutoff. Unplug it.
Turn the gas shutoff handle a quarter turn so it sits crosswise to the pipe.
Careful. If you smell gas at any point, stop. Do not touch switches. Leave the house and call your gas supplier from outside.
- 2
Remove the lower access panel
On many gas dryers a panel at the bottom front, below the door, opens to the burner. It is usually held by a couple of screws along one edge. Support the panel as the last screw comes out.
On some dryers you reach the burner by taking off the front panel instead. Your manual or the wiring sheet inside the cabinet shows which kind you have.
- 3
Find the igniter
Look at the burner tube that runs back under the drum. The igniter sits at its front mouth: a small flat or round ceramic element on a bracket, with two wires going to a plug.
Check that you can reach its mounting screw with the burner in place. If your dryer needs the burner tube removed or any gas part loosened first, stop here and call a pro.
Tip. Take a photo now. It shows how the new igniter should sit.
- 4
Unplug the igniter
Follow the two igniter wires to their plug and pull the halves apart. Squeeze the locking tab if there is one.
Pull on the plug body, not the wires.
- 5
Remove the mounting screw
One screw holds the igniter bracket to the burner. Back it out and keep it. The new igniter may not come with one.
Tip. Hold the bracket as the screw comes free so the igniter does not drop.
- 6
Ease the old igniter out
Slide the igniter and bracket straight out, keeping the element clear of the burner. If it is already cracked it may crumble, and that is fine.
- 7
Match the new igniter
Hold the old and new igniters side by side. The shape, the bracket and the plug should match, or the kit's instructions should say how it fits.
Use an igniter listed for your dryer's model number.
Careful. Do not touch the element. Handle the igniter by its ceramic base or bracket only.
Buy the part
Gas dryer igniter
Opens AppliancePartsPros in a new tab. Where’s my model number?
What to look for
- Your dryer's model number from the rating plate inside the door. Search by that.
- The part number printed on the old igniter or its bracket.
- The same shape (flat or round), bracket and plug, or a kit that lists your model number.
Some igniter kits are made to replace more than one older style. Only use one that lists your dryer's model number, and follow the kit's instructions.
- 8
Install the new igniter
Slide the new igniter in the same way the old one came out. Check it against your photo. It should sit square in the mouth of the burner, the same as before.
Start the screw by hand, then snug it. Firm is enough. Overtightening can crack the ceramic.
- 9
Plug it in
Push the plug halves together until they click. Tuck the wires away from the burner.
- 10
Refit the lower panel
Put the access panel back and replace its screws.
- 11
Gas on, power on, and test
Turn the gas shutoff handle back in line with the pipe, then plug the dryer in.
Run a heat cycle for a few minutes. You should see an orange glow, then the burner lights and the air coming out of the vent turns warm.
Buy the part
Get the right replacement
Buy the part
Gas dryer igniter
Opens AppliancePartsPros in a new tab. Where’s my model number?
What to look for
- Your dryer's model number from the rating plate inside the door. Search by that.
- The part number printed on the old igniter or its bracket.
- The same shape (flat or round), bracket and plug, or a kit that lists your model number.
Some igniter kits are made to replace more than one older style. Only use one that lists your dryer's model number, and follow the kit's instructions.
Know your limits
When to call a pro
Stop and call a pro if
- You smell gas at any point. Do not touch any switches. Leave the house and call your gas supplier from outside.
- A carbon monoxide alarm goes off. Get everyone outside and call 911 or the fire department from outside.
- Reaching the igniter means removing the burner tube or disconnecting any gas connection.
- The igniter glows, then goes out, and the gas never lights. That points to the gas valve coils, which are pro work.
- You see scorch marks, melted wires or flame outside the burner.
FAQ
Gas dryer igniter questions
Igniter or flame sensor: how do I tell?
Watch a heat cycle. No glow at all points to the igniter, or to a flame sensor stuck open. A glow that stays on and never lights the gas points to a flame sensor stuck closed.
A glow that goes out after a minute or two with no flame points to the gas valve coils.
Do I have to disconnect the gas line to replace the igniter?
No. On many dryers the igniter comes off with one plug and one screw, and no gas fitting is touched. If your model has you remove the burner tube or loosen any gas part to reach it, leave that to a pro.
My igniter tests fine. What next?
Check the flame sensor, which sits on the burner next to the igniter, and the thermal fuse. Both are easy to test with the same meter. Our no heat guide walks through the order.
Can I light the burner by hand while I wait for the part?
No. Gas dryers light automatically, and manufacturers warn never to try to light the burner by hand. Wait for the new igniter.
Related
Keep going
- SymptomDryer runs but won't heatThe drum tumbles but the air stays cold. On an electric dryer, start with the breaker and the thermal fuse. On a gas dryer, start with the gas shutoff and watch the igniter.Open guide
- SymptomDryer takes too long to dryLoads need two cycles, or come out damp. On gas and electric dryers alike, the usual cause is restricted airflow: a clogged lint screen, a blocked vent or a crushed duct. Load size matters too.Open guide
- Dryer partGas dryer flame sensorGas dryers only. The flame sensor is a small heat-sensing switch on the side of the burner. It tells the gas valve when the igniter is hot enough. A bad one can stop the dryer heating, or make it heat for a few minutes and then go cold.Open guide
- Dryer partGas valve coilsGas dryers only. The gas valve coils are small electric windings that open the dryer's gas valve. A classic sign of failing coils is an igniter that glows, then goes out, with no flame. Because they sit on the gas valve, testing and replacing them is pro work.Open guide
- Dryer partThermal fuseThe thermal fuse is a one-time safety fuse that blows when the dryer overheats. Gas and electric dryers both have one. A blown fuse is a warning about airflow, so clean the vent before you replace it.Open guide
- Dryer partBurner assemblyGas dryers only. The burner assembly is the tube where gas mixes with air and burns, plus the small orifice that meters the gas. The igniter and flame sensor mount on it. Burner problems are uncommon, and any work on it is for a qualified pro.Open guide